Welcome back to our weekly newsletter about drywall and related topics! Today we are going to discuss what does plastering and taping mean in our industry and how to do it. So, let’s get going & start with plastering!
PLASTERING
One of the services that we offer at Drywall Pro-Finishing is plastering. Plastering works well as a reinforcement for your drywall. The first step that you need to take is to make sure that your drywall is in good condition and that there are no bumps, holes, cracks, etc. If your drywall isn’t new, sand over the wall and fill in any holes & groves that need to be filled.
Once the drywall is dry, add chemical plaster bonder that will help you plaster- bond to the drywall. Since the drywall is covered in paper, applying plaster without a chemical bonder won’t work.
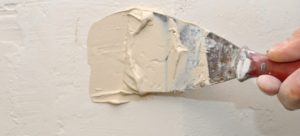
The next step is getting acquainted with how to use your hawk and trowel. When you’re ready, apply lightweight base-coat plaster over the entire wall.
Using a ratio of 3:1 of quick-set gauging plaster to lime putty, mix the finish coat with a drill and a mixing paddle. Always refer to your manufacturer’s instructions when mixing and applying your finish coat and keep it around when you need it. Most coats should be about 3/16 inch thick.
Now that you have your wall plastered, let’s move on to the second portion of today’s instruction’s; Taping!
TAPING
What is taping when it comes to drywall? When you ‘mud’ your drywall & the corners of it (use quite a lot of mudding), you will have to tape over this mud/ plaster. Use your trowel to press the tape into the mud and smooth it down, starting halfway down the joint. Then go back to the middle and smooth upwards along the joint and repeat.
Please be careful around the corners: You’ll notice the tape has a center line, and that’s to make it easy to fold when it’s time to do the corners. Coat either side of the interior corners with mud, fold a section of tape in half, and press it into the corner and finally smooth it down with your knife.
Make sure you finish the job: Fill any screw or nail holes with more mud and/or scrape away the excess, and leave it to dry. It can take up to 24 hours for it to dry, so wait until the mud is white (not grey) before proceeding to the next step. Repeat the mudding, taping, drying, and sanding process once or twice more, if needed until you’re done.
Please remember to always keep safety in mind and if you feel like you need help, why no let the professionals take over? We, at Drywall Pro-Finishing, have been doing this for a long time and in the end we will have the job well done and save you money by being resourceful and productive. We also know the procedures and how to have your drywall done correctly in the Greater Toronto Area (GTA) & beyond.
If you have any questions or if you would like to get in touch, please feel free to contact us today to find out how we can complete you drywall projects for you at a reasonable price and in a timely, professional manner. We are always looking forward to be hearing from YOU! Stay tuned for more drywall related information, advice, & news from Drywall Pro-Finishing and as always: stay constructive!